Rentvine already holds the record of how your portfolio runs: every unit, lease, listing and work order. Connect it to your PropertyManagement.com profile, and we calculate Occupancy Rate, Speedy Repair, Speedy Leasing and Lease Renewal Expert from that history after every sync, with no exports to pull. Our team verifies the result before a certification goes live. Setup takes about five minutes, and the key you create can only read.
What you'll need
- A Rentvine login that can open Users, Roles and API under Settings. That's usually an Administrator.
- Your Rentvine subdomain, the part before .rentvine.com in the address you log in at. If you sign in at acme.rentvine.com, it's acme.
- Your PropertyManagement.com Client Dashboard login. If you're not verified yet, get verified first; it's free.
Before you start: give us our own read-only role
Every Rentvine API key runs under a role, and the key can do whatever its role allows. Plenty of integrations get set up on the Administrator role, which hands them the run of your account. We don't need that. Rentvine's product team confirmed that a role with all of its permission toggles turned off is read-only, and reading is all our sync does. Rentvine's own guide to its open API recommends a restricted role for outside tools, too.
A dedicated role and key also keep things tidy on your side. You can see exactly what PropertyManagement.com can access, and you can remove it without touching any other integration.
Step 1: Open Users, Roles and API
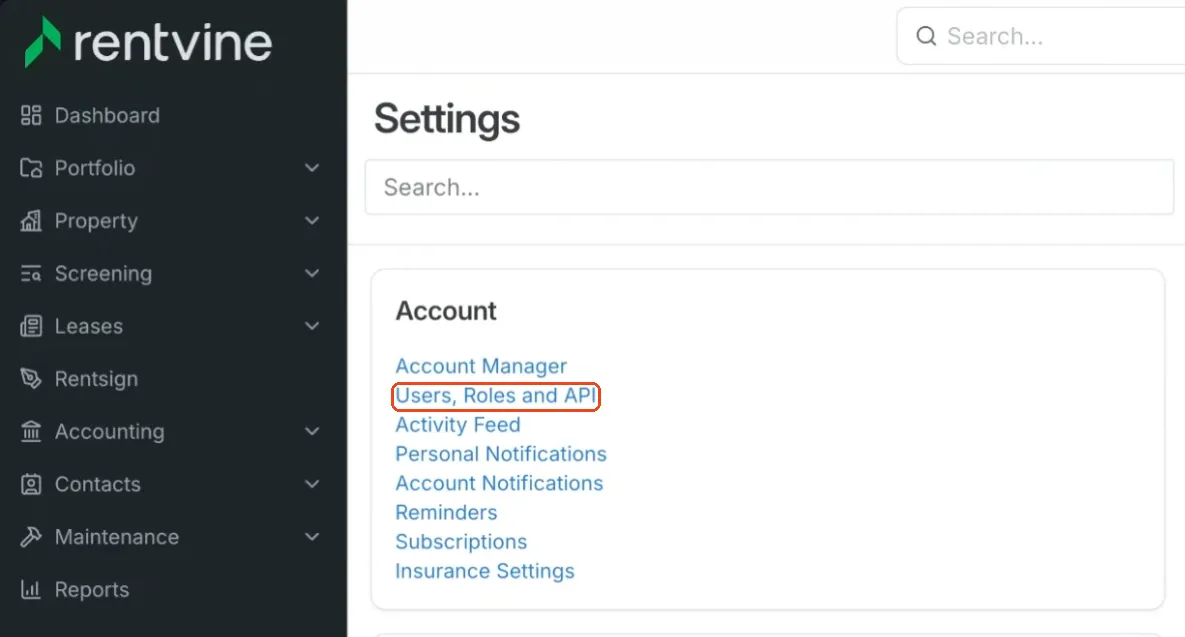
In Rentvine, open Settings. Under Account, click Users, Roles and API.
Step 2: Start a new role
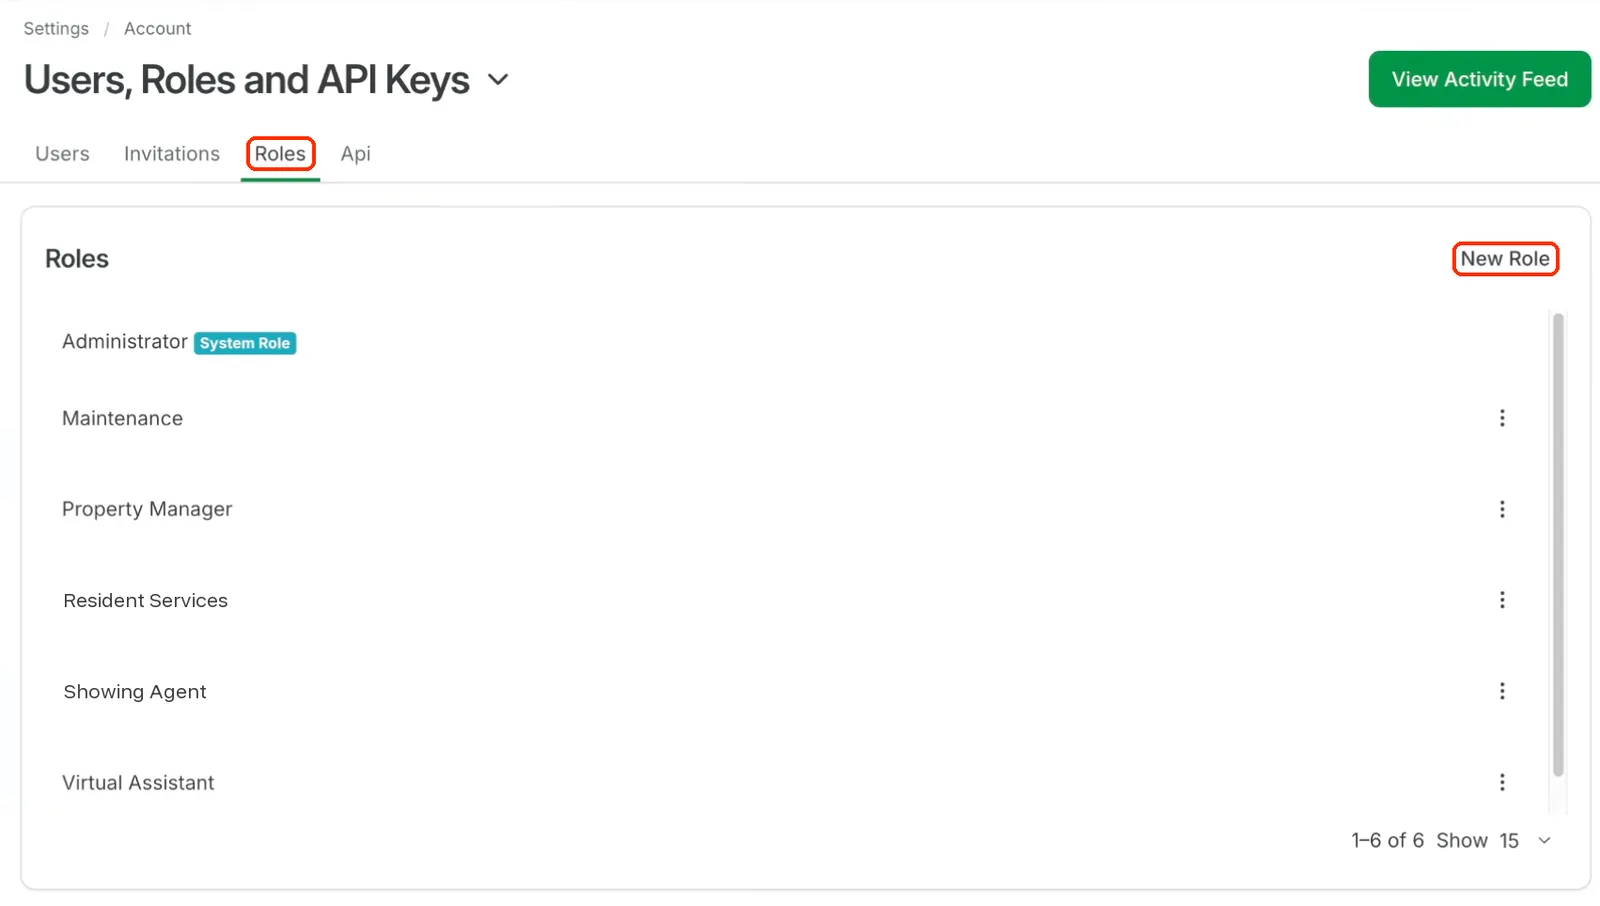
Click the Roles tab, then click New Role in the top-right corner of the Roles list.
Step 3: Name it PropertyManagement.com and leave every permission off
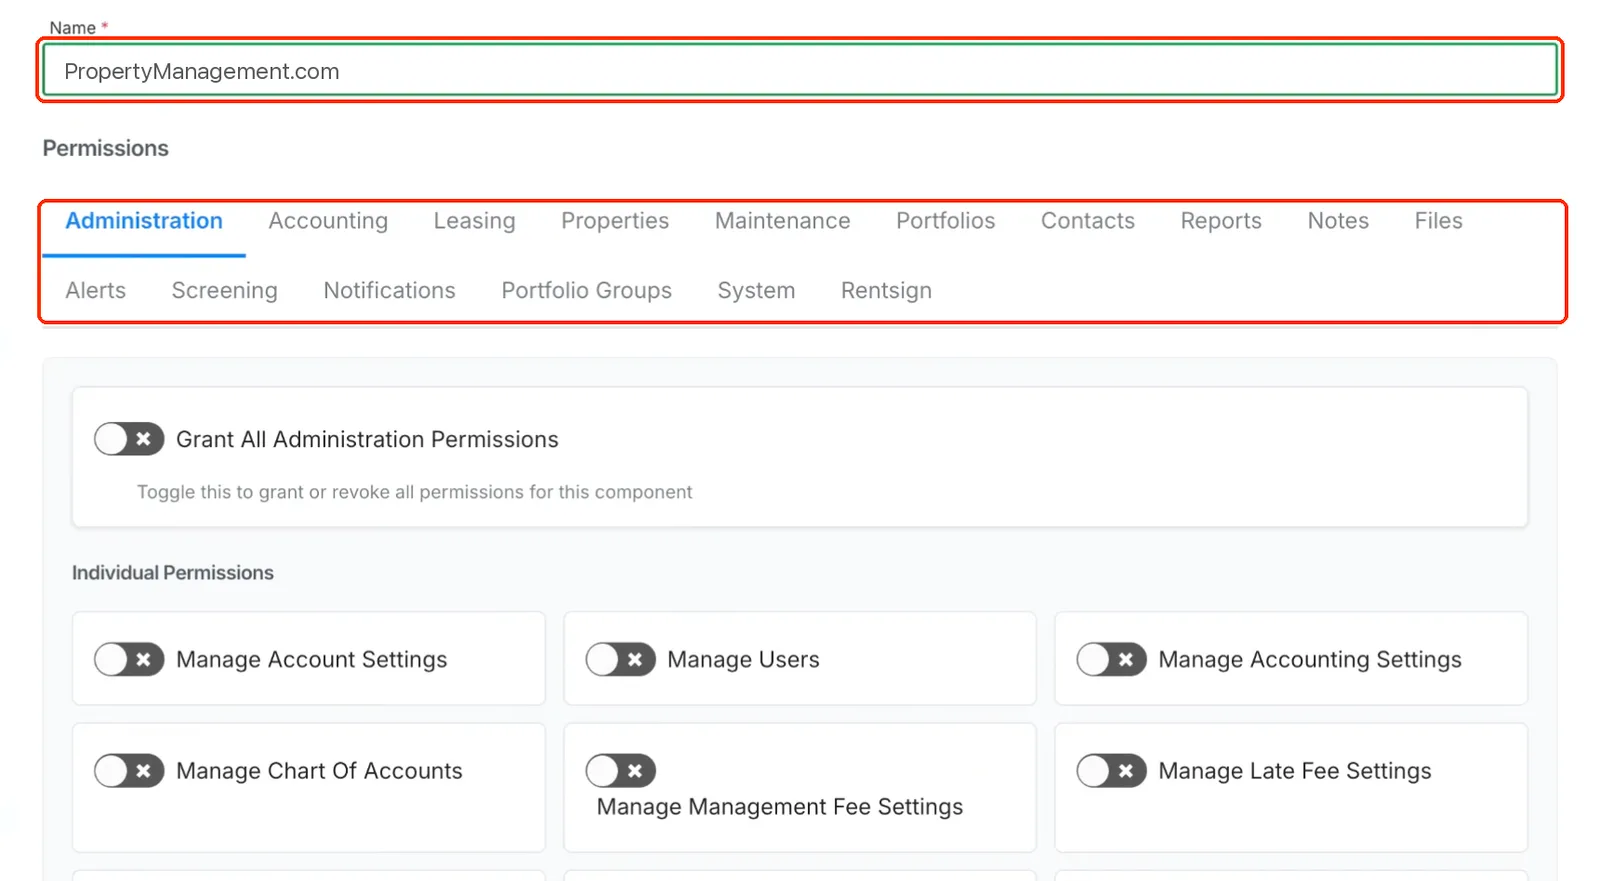
In the New Role window, type PropertyManagement.com in the Name field. Then leave the permissions alone. The toggles are spread across the tabs, from Administration through Rentsign, and every one of them should stay off. Click through the tabs to confirm nothing is switched on, then click Save at the bottom of the window.
Step 4: Create a new API key
Click the Api tab, then click New API Key.
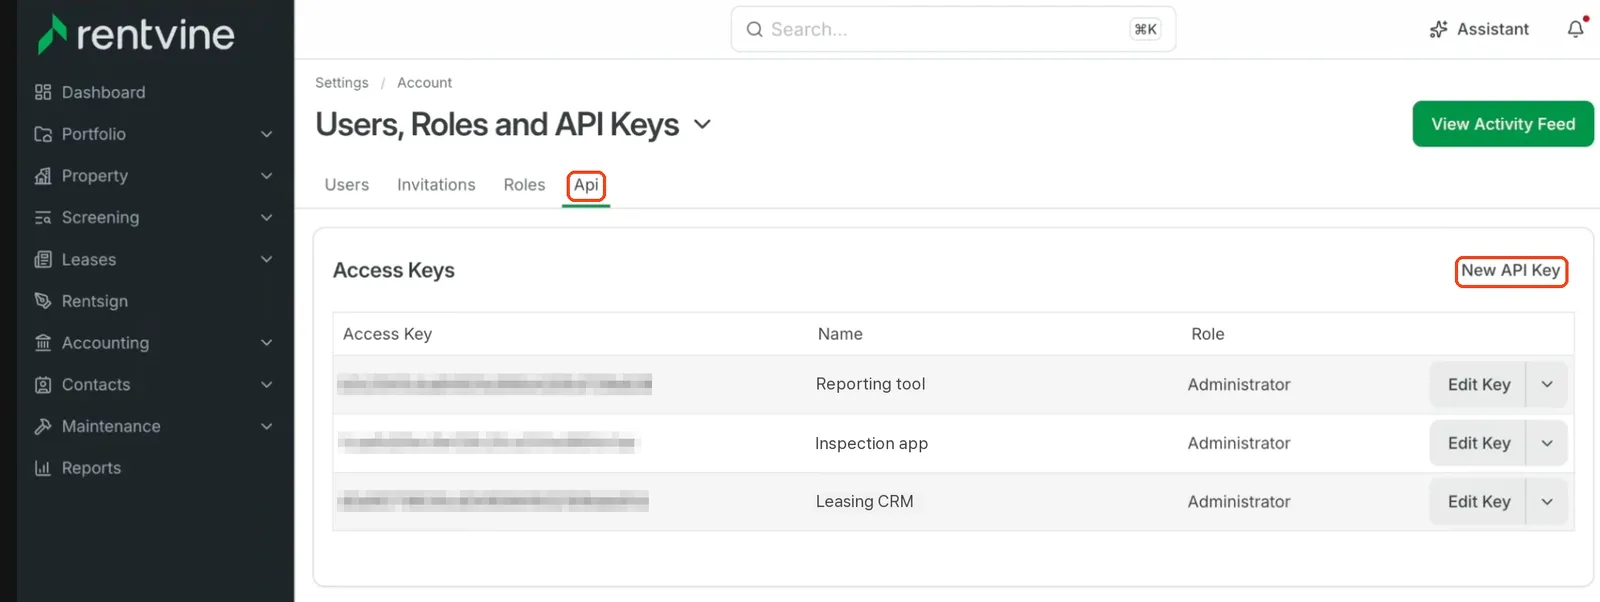
If other tools already have keys here, leave them as they are. Your new key gets its own role, so it doesn't change theirs.
Step 5: Name the key and give it the PropertyManagement.com role
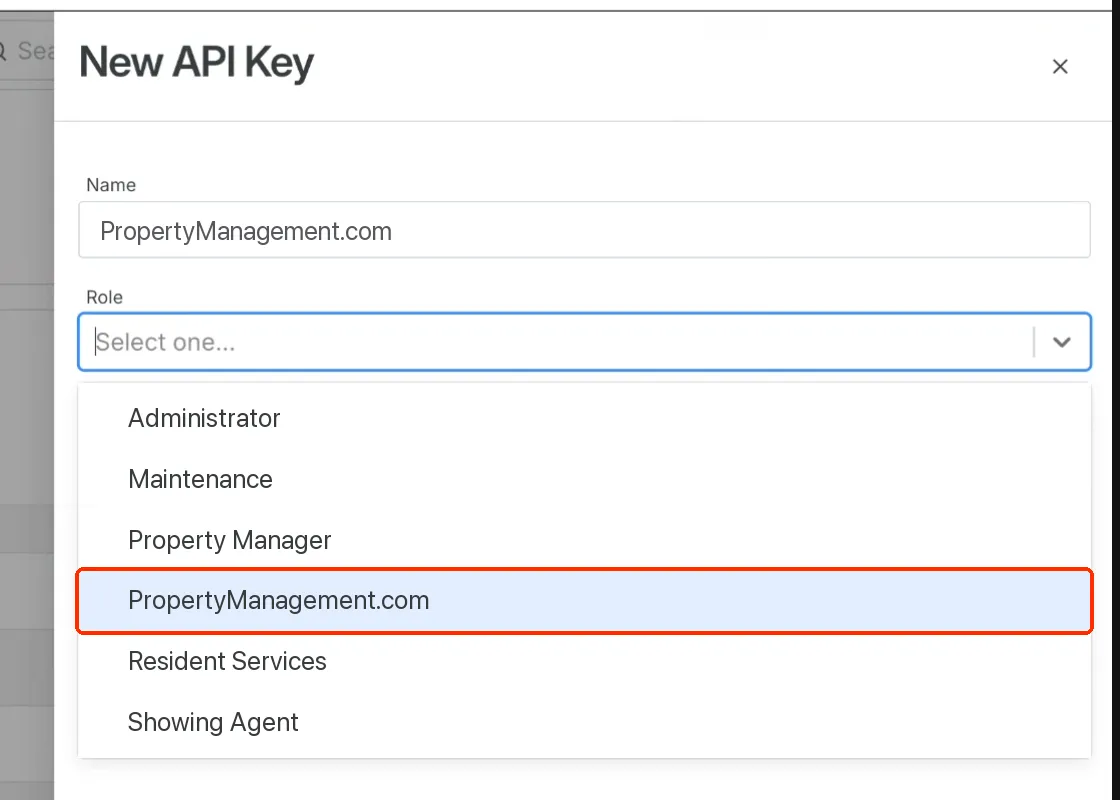
Name the key PropertyManagement.com so it's easy to spot later. Open the Role menu, choose PropertyManagement.com (the role you just made, not Administrator), and save the key.
Step 6: Copy your access key and secret
Rentvine shows your new access key and secret. Copy both somewhere safe before you close the window.
Step 7: Connect it in your Client Dashboard
In your PropertyManagement.com Client Dashboard, open Connect Tools, select Rentvine, and fill in three fields:
- Subdomain. The part before .rentvine.com, like acme. Pasting your full Rentvine address works too.
- Access key. Paste it from Rentvine.
- Secret. Paste it from Rentvine.
Click Save connection, and we verify the keys with Rentvine on the spot. Your keys are encrypted when you save them and never shown again.
If you run Property Meld for maintenance, connect it too. The Property Meld guide covers that connection.
What we sync, and why
The connection only reads. We pull your properties and units, listings, leases and tenants, work orders, and your chart of accounts with posted charges and payments. We never change anything in Rentvine, and with a read-only role the key couldn't if we tried.
That data powers the verified side of your profile:
- Certifications. As of October 2026, your Rentvine connection calculates Occupancy Rate, Speedy Repair and Speedy Leasing from your real numbers, plus Lease Renewal Expert in beta. Rent Collection Rate still needs an upload, because Rentvine's sync doesn't include how much of each charge was paid. Here's the report to use. Rental Price Accuracy and Financial Trust need an upload for every software; how to get certified lists the reports.
- Ranking in property owner searches. Your verified certifications count toward how you rank when property owners search PropertyManagement.com with their rental address.
Your synced data is handled under our data collection and usage policy for integration data: it powers your own profile and certifications, anything beyond your profile is aggregate and de-identified, and nobody gets your identifiable data without your explicit opt-in.
Changing or removing access
To cut off the sync, delete the PropertyManagement.com key on the Api tab. To swap in a new secret, open the key, regenerate the secret, and update the connection in Connect Tools right away so the sync keeps running. Either way, the change stays on our key and our role, so your other integrations carry on as before.
Troubleshooting
- "No Rentvine account exists for that subdomain." Enter only your account code, the part before .rentvine.com.
- "Rentvine rejected these credentials." The access key goes in the Access key field and the secret in the Secret field. Check for extra spaces. If you closed the window before copying the secret, regenerate it and paste the new one.
- "Rentvine denied API access." Rentvine recognized the key but blocked the request. Open the key on the Api tab, confirm it's assigned to the PropertyManagement.com role, and try again. If it still fails, email support@propertymanagement.com and we'll work through it with you.
- The sync stopped after it was working. Someone on your team may have deleted the key or regenerated its secret. Create a new key on the PropertyManagement.com role, open Connect Tools, click into Rentvine, paste the new values, and click Update connection.
Frequently asked questions
Do I need to give PropertyManagement.com Administrator access?
No. A role with every permission turned off is all we need. Rentvine's product team recommended that setup for our integration, and it's the one this guide walks through.
Can PropertyManagement.com change anything in my Rentvine account?
No. Our integration only reads data, and the PropertyManagement.com role has no permission to change anything, so the key itself can't make changes. You can delete the key anytime without touching your other integrations.
What does the connection cost?
Nothing on our side. Claiming your profile, connecting your software, running property owner surveys, and earning certifications are free for property managers, permanently. Money never touches the math. On Rentvine's side, Rentvine says its open API is included at no extra cost, with no premium tier required.